Running on Azure Batch
Azure Batch is a cloud-based service that allows you to run large-scale parallel and high-performance computing applications. This section provides an overview of how to set up and run SCHISM on Azure Batch.
Warning
This documentation is provided solely as guidance for using Azure Batch with SCHISM and related tools. The authors and organizations involved are not affiliated with, endorsed by, or in partnership with Microsoft Azure. No promotion or recommendation of Azure services is intended; Azure is referenced here only because it is the platform currently used for these workflows by DWR’s Modeling Support Office.
Setup Azure
Download Azure Utilities
Azure is a paid service separate from SCHISM, BayDeltaSCHISM, and CA-DWR. Once you have set up your Azure batch and storage accounts within your Azure resource group, you’ll need to download a few things:
- Azure CLI
download and install on your machine to pass jobs (simulations) to Azure batch
this is likely a command line string that you’ll run and re-launch a terminal
you can also use pip install azure-cli –upgrade after creating the azure environment in download_dmsbatch
- AzCopy
download and install on your machine to upload content to storage container
- Azure Batch Explorer (desktop app)
this isn’t technically necessary, but is quite helpful in managing ongoing simulations
- Azure Storage Explorer (desktop app)
again, not technically necessary, but quite useful
Setup can be done via az commands. Here we setup a batch account with associated storage.
Login
Login with your Azure credentials in a console with admin access.
az login --use-device-code
Copy in the code from the console then go to https://microsoft.com/devicelogin and paste into the browser window to verify your credentials.
You may get a “certificate verify failed” message. If you are on a government network you may have firewall settings that restrict all SSL. You’ll either need to talk to your IT personell or use a personal network.
To test that your login worked, use:
az account show
This will show your account info.
Register with Azure
Set Console Variables
See the Azure docs for details. To use the commands below, enter your values (replacing the <angle brackets and values>) and export them to your console. You’ll need to do this each time you open a new console, or you can set them in your .bashrc or .zshrc file.
export MY_RG="<resourcegroupname>"
export MY_LOCATION="<location_name>"
export MY_STORAGE="<storage_account_name>"
export MY_BATCH_ACCOUNT="<batchaccountname>"
For the –location, you can use any location, but eastus and westus2 is what DWR uses. For a whole list of all Azure locations see this link.
For naming conventions: The storage account name typically ends in “sa”, and the batch account typically ends in “batch” for ease of navigating resources on Azure. You’ll want your resource group, storage account, and batch account in the same region/location.
Create Azure Accounts
az group create --name $MY_RG --location $MY_LOCATION

az storage account create --resource-group $MY_RG --name $MY_STORAGE --location $MY_LOCATION --sku Standard_LRS

az batch account create --name $MY_BATCH_ACCOUNT --storage-account $MY_STORAGE --resource-group $MY_RG --location $MY_LOCATION
You can also create the batch account and associated account as explained here.
You may encounter some errors about regional quotas. You’ll want your resource group, storage account, and batch account in the same region/location. So you may want to ensure that the machine type is available in your region before picking your resource group’s location. To see what VM types are available in your region, use:
az batch location list-skus --location westus2 | grep -i hb
where “hb” is the VM type that we typically use for SCHISM (as of writing this version of the support documentation - see azure_dms_batch templates’ default_config.yamls for the current uses) If you see no output, then that VM type is not available in that region.
Removing a Resource Group
To remove a resource group and all associated resources, use:
az group delete --name <resource_group_name>Warning
If you remove a resource group, all associated batch accounts, storage accounts, and data will also be permanently deleted.
Download azure_dms_batch
Git clone the azure_dms_batch repository
git clone https://github.com/CADWRDeltaModeling/azure_dms_batch.git
Navigate to the azure_dms_batch folder created above, and use the environment.yml with conda to create an environment called azure
conda env create -f environment.yml
or if you’re not using conda:
pip install -r requirements.txt
Stay in the azure_dms_batch repo folder and then install using:
conda activate azure
pip install --no-deps -e .
For more information on the azure_dms_batch package, see the README.md file.
Upload Applications
Azure batch requires the setup and installation to happen via zip files that are called application packages. The user should specify these packages with the version names as specified in the template. Here we will refer to the alma87_mvapich2 template.
The app-packages/batch_app_package_and_upload.sh script can be used to upload the packages which you will do in the following steps.
SCHISM
For SCHISM, you’ll need to either compile and zip the executables yourself, or you can refer to the releases page and download the relevant schism_with_deps_*.zip file. For HelloSCHISM and BayDeltaSCHISM tutorials, we’ll refer to the latest schism release, schism_with_deps_5.11.1_alma8.7hpc_v4_mvapich2.zip. You’ll also need the latest alma release, nfs_alma8.7.
Save the .zip file to your local azure_dms_batch repository under azure_dms_batch/app-packages.
Now use app-packages/batch_app_package_and_upload.sh to upload in the command line.
Use the export variables like MY_BATCH_ACCOUNT etc before using these commands (guidance Set Console Variables):
cd <path-to-azure_dms_batch>/app-packages

source batch_app_package_and_upload.sh

package_and_upload_telegraf "telegraf" $MY_BATCH_ACCOUNT $MY_RG
package_and_upload_app schism_with_deps 5.11.1_alma8.7hpc_v4_mvapich2 schism_with_deps_5.11.1_alma8.7hpc_v4_mvapich2.zip  $MY_BATCH_ACCOUNT $MY_RG
package_and_upload_app nfs alma8.7 nfs_alma8.7.zip  $MY_BATCH_ACCOUNT $MY_RG
package_and_upload_batch_setup "../schism_scripts/" $MY_BATCH_ACCOUNT $MY_RG
Python Packages
For python packages like schimpy and BayDeltaSCHISM’s bdschism you can also use the batch_app_package_and_upload.sh script to upload the packages to your batch account.
cd <path-to-azure_dms_batch>/app-packages

source batch_app_package_and_upload.sh

package_and_upload_schimpy $MY_BATCH_ACCOUNT $MY_RG
package_and_upload_bdschism $MY_BATCH_ACCOUNT $MY_RG
The above utility names the package with today’s date and then uploads it and sets it to the default version.
You can check the versions of packages and which is considered the default by going to the online Azure Portal and navigating to your batch account. Once in your batch account, navigate to Features > Applications. There you’ll see th application IDs as well as the default version that’s being used.
If you were to want to upload a development or updated version of any of these packages you could use a similar approach to the package_and_upload techniques, and then use the online portal to specify the default version.
File Transfer Commands
azcopy commands
The basic syntax of azcopy to copy local to Azure is:
azcopy copy "<local_directory>" "<azure_storage_account/blob_container>/?<sas_link>"
- and for Azure to local:
azcopy copy "<azure_storage_account/blob_container>/?<sas_link>" "<local_directory>"
But at the Delta Modeling Section we most often use something like:
export AZLINK="https://<storage_account>.blob.core.windows.net/<blob_storage_container/"
export sas="<sas_link>"

azcopy copy "<local_directory>" "${AZLINK}<blob_storage_container>/?${sas}" --exclude-regex="outputs/.\*nc" --recursive --preserve-symlinks --dry-run
where:
- local_directory
whatever local path to your simulation directory you’re uploading
- storage_account
name of your Storage Account through Azure (not the same as the Batch Account name)
- blob_storage_container
folder path to your blob storage container
this will look like a folder path (eg: project_name/simulations/)
- sas_link
SAS permissions key (generated each day for security)
Generating SAS Links
you can generate and copy the SAS key by navigating to your storage account in the Azure Portal > going to “Containers”
Click on the three dots to the right of your blob container > Generate SAS
On the “Permissions” drop-down: click all boxes
Click “Generate SAS token and URL”
copy the “Blob SAS token option”
azcopy options
These are some of the most frequently used azcopy flag options:
- –dry-run
this is useful to test your command before running
this flag prints a list of which files will be copied where without actually uploading/downloading anything
- –recursive
this will copy all files in all subdirectories
- –preserve-symlinks
any symbolic links will be preserved in the upload to the blob container
- –include-regex
use a Regular Expression to limit which files are included in the upload
- ex: –include-regex=”suisun_(2|3|7)/.*;baseline_6/.*"
- this would upload all folder contents of
suisun_2/
suisun_3/
suisun_7/
baseline_6/
The .* string signifies “all contents”
- –exclude-regex
use a Regular Expression to determine which files are excluded in the upload
this is particularly useful for things like outputs *.nc files and sflux *.nc files which are very large and costly to upload
- ex: –exclude-regex=”outputs.*/.*nc;sflux/.*nc”
this would exclude any files that end in “nc” that are found in the sflux, outputs, or outputs* folders
Ensure Batch Quota
You’ll need to go to the Azure portal, to your batch account, and then to Settings /> Quotas.
From here you’ll want to click “Request Quota Increase”. Then you’ll do the following to get this message to “Manage Quota”.
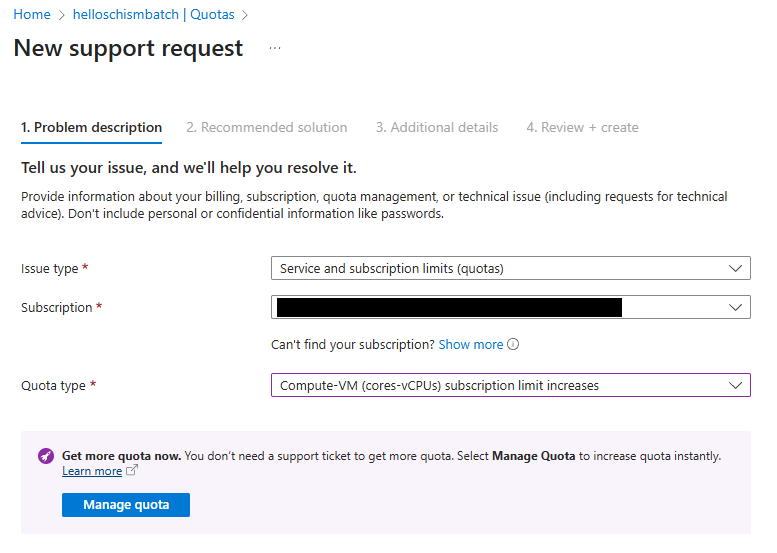
Fig. 13 Batch quota request fields to get to “Manage Quota”
From here, you’ll want to increase the quota for HBv2 Series to approximately 300. That should be enough for a HelloSCHISM tutorial run.
If your region doesn’t support HBv2 or you have any deeper issues with Azure, you may need to consult with your IT support. Anything that isn’t covered on this page is not within the scope of the HelloSCHISM or BayDeltaSCHISM tutorial realm.
References
Python SDK Setup BlobStorage Python Example Azure Batch Python API Azure Batch Python Samples Azure Batch Shipyard
MPI specific Azure Batch MPI Cluster configuration options
Intel MPI Azure settings for Intel MPI Intel MPI Pre-requisites